4.13.2014

A Quilt For Granny Part 2

Continued from previous post....

I love this technique so much that I decided to make one more!


This time I used the Lil' Inker Designs Circle and Diamonds Stitched template die to "quilt" my card base.  The sentiment panel is also a Lil' Inker die.  The flowers are cut with the Beautiful Blooms II #1 dies and stamped with Beautiful Blooms II in VersaMark and then clear embossed.  I tried stamping them first, but decided it looked too busy.  The leaves are from the Delightful Dahlia stamp set and are die cut and embossed the same way as the flower.  I used a beautiful sentiment from the Script Sentiments stamp set, which I stamped in black and then embossed with clear powder.


I am so happy with both of these cards!  They turned out exactly as I envisioned them, and they really look like a beautiful handmade quilt!  LOVE IT!

All products used are from Papertrey Ink unless otherwise noted.

A Quilt For Granny

Dawn McVey demonstrated a technique this week on the Make It Monday Challenge #159 that I absolutely LOVE!  I had so much fun playing along with this one!

The idea is to make your card look like a handmade quilt with the quilted stitching, but without having to sew on your card.  Here is the photo she used as her inspiration:


And here is one of the cards she created for the tutorial:


I just adore how this looks!  It really looks like a handmade quilt to me.  Quilts like this always remind me of my Grandma, because she used to make patchwork blankets.  I still use the one she gave me when I was a little girl nearly every day.  In fact, my blanket is so loved that it's slowly falling apart at the seams.  I guess that's what 25 years of daily use [the first 5 or 10 included dragging it everywhere I went and building forts with it] will do to a blanket.  :)  LOL

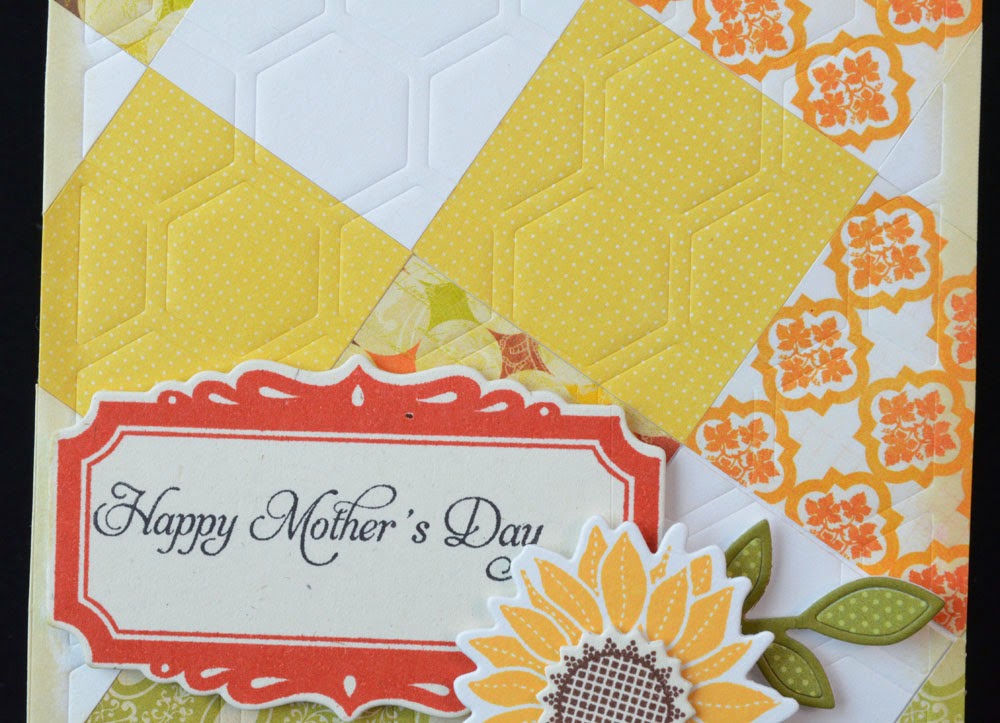
Anyway, I decided that I would make my Grandma a "quilt" in return.  :)  As in, a quilted card for Mother's Day!


My card base is Stamper's Select White cardstock.  All the patterned papers came from 6x6 paper pads I have, but I forgot to make a note of which ones I used.  The sentiment comes from the Delightful Dahlia stamp set.  I used one of the dies and stamps from the Pretty Peonies set for the sentiment panel and frame, which is stamped with Terracotta Tile ink.


The flower comes from the Simple Sunflower mini stamp set, and is die cut with the matching dies and stamped with Summer Sunrise and Dark Chocolate inks.  

I die cut those cute leaves with a die from Poppy Stamps.  Since I don't have the solid die that matches, I had to get a little creative when I paper pieced it together.  I really wanted them to have a quilted feel of their own, so I wanted to paper piece them together, but didn't have a solid background to adhere them to [I didn't want them to be glued down on the card].  So I covered some cheap white cardstock with Be Creative Tape and ran it through my Big Shot.  The die didn't cut all the way through, but it cuts through the protective sheet on top.  The I just pealed off the pieces of protective paper one at a time and stuck the colored die cuts where they belong.


And of course I had to "quilt" the card background.  After gluing down all the little paper squares, I ran the card through my Big Shot with Hexagon Cover Plate die to emboss it [using embossing pads of course].  For a tutorial on how to do this technique click here.

Continued in next post...

4.05.2014

Have a Beauty Full Birthday

One more birthday card for the Simon Says Stamp Birthday Challenge.


I started with several colors of paper from Papertrey Ink and cut some strips.  I attached those strips to a piece of cheep printer paper to line them up and keep them together.  Then I inked up a cool background stamp called Peacock Feather from Penny Black with VersaMark ink and stamped over the colored strips.  Then I heat embossed them with clear embossing powder.  I love the subtle yet glossy look it creates!


The sentiment comes from a stamp set by The Craft's Meow called Fly Free.  I stamped it with Hawaiian Shores ink and then clear embossed over the top so it would coordinate better with the background.

The butterflies were heat embossed with white powder on vellum.  Those stamps are from Hero Arts and have matching dies.  I added some pretty mirrored pearls to each butterfly for a little bling.


Another clean and simple card!  :)

Celebrate Your Day!

Here's another birthday card.  I'll be entering this one in the Simon Says Stamp Birthday Challenge AND the My Favorite Things Color Palette Challenge.


The stamps I used are from Papertrey Ink:  Fancy Flourishes and Signature Greetings.


I inked up my flourish stamp with Distress Inks: Peacock Feathers and Mowed Grass.  All of the papers I used are from Papertrey Ink: Classic Kraft, Hawaiian Shores, Raspberry Fizz, and Stampers Select White.  After stamping the sentiment, I felt like it got lost in the background so I stamped over it with VersaMark and then heat embossed it with clear powder to give it some dimension and shine.....now it really pops!  And the little butterflies were punched out with a Martha Stewart punch from the Raspberry Fizz paper.  I added a few little gems and D.O.N.E.


4.04.2014

A Happy Dragon

Here's another post for the Simon Says Stamp Birthday Challenge.


I used the Lawn Fawn Critters Ever After stamp set for this card.  Each piece was colored with Copics and hand cut.  [ the matching dies are still on my wish list  :)  ]  

The clouds are die cut with a Lil' Inker Designs die.  That cute stitched outline makes these clouds awesome!  I created that banner in the background by simply cutting a notch out of a rectangular piece of paper, then colored the edge with a copic marker and stamped some little stars in the background.


All the pieces are popped up with dimensionals on my card base.  I love how cute and whimsical this card is!  I made it for my niece who turned 5 last week.  Happy Birthday, Izzy!

A Jar of Roses

Here is another card for the Simon Says Stamp Birthday Challenge.


I had fun with this one!  The flowers are from the PTI Rosie Posie stamp set and Rosie Posie Step 2.  I stamped the solid flowers in Lavender Moon ink and the darker detail in Autumn Rose on Rustic Cream paper.  I masked them off as I stamped them so that they wouldn't overlap, and then I cut them out by hand.  I decided it looked too flat, so I die cut and stamped another flower to pop up on top of my bouquet for dimension.


The leaves were die cut and then stamped with Simply Chartreuse and Ripe Avocado which I stamped off once on scrap paper before stamping on my leaves.

The jar comes from the Lawn Fawn Summertime Charm set and is stamped on vellum.  I stamped the flower stems from the Lawn Fawn Our Friendship Grows set on my card panel and then attached the jar over the top.  Then I added a label to my jar with the sentiment.


This card has lots of dimension and is probably going to cost extra to mail, but I love it!  I adore those little roses!  Someone special will be getting this birthday card in the mail, extra postage or no!  :)

Happy Birthday, SSS Blog!

Today I'm playing along with the Simon Says Stamp Birthday Celebration.


Here is a card I made for a lady I work with.  The flowers and leaves come from the Simon Says Stamp Best Mom Ever stamp set.


I stamped the flowers with VersaMark and then heat embossed with white powder.  I used a water brush and some PTI ink to water color my flowers and then I cut them out by hand.

I stamped the leaves directly onto my card panel and popped up the flowers.  The sentiment is from the PTI Movers and Shakers Sentiments stamp set.

I just added some cute little frosted clear pearls for a little sparkle and extra detail.  The whole panel is popped up on my card base.


I love how clean and simple this card is, yet it's still beautiful and interesting.  The popped up panel and flowers give it lots of dimension.  And the subtle water coloring of the flowers looks very soft and pretty.  I'm new to water coloring so I wasn't sure how it would turn out, but I'm really pleased with the result!  :)