11.24.2015

One Stamp 5 Ways

The final challenge of the Holiday Style class is to use one stamp or stamp set in 5 different ways.  Since I've been either sick or working the past several days, I haven't had time to create 5 cards yet.  However, I did manage to get the first one done and I plan to add the rest as soon as I can get them finished.

The stamp set I am using as my main focus is Deck The Halls from Papertrey Ink.


I'll be back later with the details on this card, as well as the other 4 I plan to make.  :)


11.23.2015

Sparkly Lights

I'm back for day 7 of the Holiday Style card class from Online Card Classes.


Day 7 focuses on Shimmer & Shine, so I pulled out some glitter embossing powder that I've had FOREVER to use on this card.


 I have to tell you, this northern lights technique is a lot harder to accomplish than I thought it would be.  I wasn't entirely happy with how mine came out either, but once I added the glitter embossing powder, I liked it a bit better.  Mostly, I didn't like how the colored parts look so straight and uniform across the background.  Anyway, the sky was done using Distress inks and sponge applicators for the colored portions.  Then, I was having trouble adding the black areas of the sky, so I ended up water coloring it using black Distress ink and water with a large paint brush.


Once I gave up on perfection, I set the panel aside to dry and worked on die cutting and coloring the other elements of my card.  The yeti and trees are from Lawn Fawn.  The camp fire is from Purple Onion Designs.  And I used an Avery Elle die to cut the snowy hills.  Everything was colored with Copic Markers, and some elements were popped up with foam tape.


The other thing I'm not totally thrilled with is how the glitter in this embossing powder completely hides the colored background if you turn it at an angle.  This is a holographic glitter so it appears to change colors as you turn it in the light.  So I guess it still has a bit of a northern lights feel about it no matter how you look at it, but I like the direct, head on view the best.

Overall, I still think it's a super adorable card, and it DEFINITELY has shimmer and shine!  But I think I'll need to practice my "northern lights" some more before I'll be happy with myself.

However, it's all about that little Yeti anyway, and he's the cutest little Yeti ever!  :)  Don't you think?

Bye!


Warm Whimsical Wishes

Day 5 of the Holiday Style class is centered on Cute & Whimsical cards.


I don't pull out my Lawn Fawn stamps often enough, and they definitely say "cute" and "whimsical".  So I pulled out my Making Frosty Friends stamp set for this card.


To start with, I stamped out my scene on scratch paper with the images overlapping to get a feel for what order I would need to stamp everything.  Then I used my "rough draft" as a guide for lining up my stamps on my Misti and stamping them out in order.  As I stamped each image, I would cover it with a mask before stamping the overlapping images.


After all the images were stamped out, I used Distress inks and ink blending tools to sponge the blue sky background.  Next, I used the Falling Snow stencil from Simon Says Stamp and Texture Paste to add the snow to the background.  Once the "snow" was dry, I peeled off my masks and colored my images with Copic markers.  I forgot to use a good blending paper, so I didn't do any blending.  I did use the colorless blender to soften the tummies of the birds and add dots to the ear muffs.


Here you can see the snow texture better and some of the coloring detail as well.  I gave the top hat a blended look simply by leaving part of it lighter gray and coloring over the rest with a darker gray.  It's not actually blended, but gives the impression that it is.

My hubby asked me to make a card for a friend of his who is going through a rough patch right now.  It's just a little thinking of you, but I wanted him to know that our FAMILY is thinking of him.  So the characters I used are representational of our family.  My husband, myself, our son, and our two dogs.  Each is colored with the favorite colors of the person, and the scarves on the birds match the collars on our dogs.  I don't know whether Ken will pick up on all of that, but it's there nonetheless. 

Warm wishes to all of you too!  It's certainly been cold here the past few days.  Wherever you are, think warm thoughts.  :) 

Oh!  I almost forgot!  The sentiment is from the Hero Arts Holiday Sayings stamp set.  Bye!

Just The Classics

I'm back with another card inspired by the Holiday Style class from Online Card Classes.  


The theme for day 3 is Classic & Elegant.  I don't know about elegant, but I think that sleds are definitely classic!  Don't you?


This first one will be my Daddy-O's birthday card next month.  All the products I used are from Papertrey Ink except for the Stickles on the sled.


I popped up the sled with foam tape for some dimension and the evergreen sprigs were popped up slightly with two layers of glue dots.


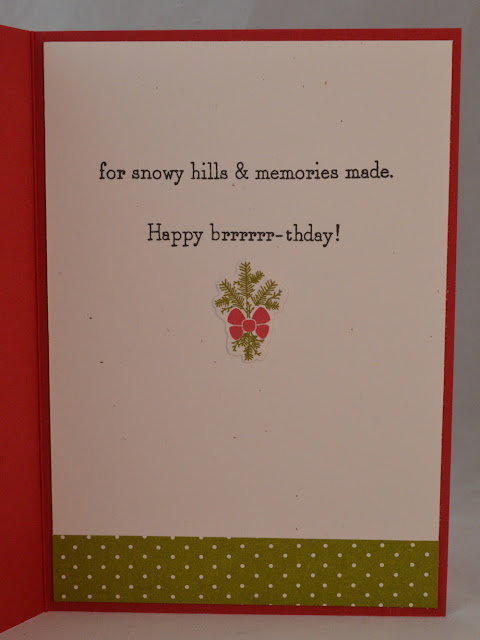
I love the sentiment combo on the inside of the card!  :)  Happy brrrrrrr-thday!  LOL


This second one will be for my boss's birthday, which is the same week as my Dad's.  All products on this card are from Papertrey Ink.


I popped up all the little pine sprigs with foam dots and adhered the button on with glue dots.


I used the same sentiments inside as before and added another pine sprig.

I think all the green and red add to the "classic" feel of these cards as well.  What do you think?

Splatters and Snowflakes

So, I recently won a giveaway on Jennifer McGuire's blog for a free spot in the Holiday Style class from Online Card Classes.  Thanks, Jennifer!  Thanks, OCC Folks!  :)


Day 1 was all about Clean & Simple cards.  I really loved one of the inspiration cards and wanted to try creating a similar background.  This was the result:


 First of all, let me say that I wouldn't have thought of this design as being "clean & simple" since there is so much going on in the background.  However, I loved the look of the original and figured I could create something similar.  I LOVE the results of my efforts!  

First, I used VersaMark ink and white and silver embossing powders to emboss the snowflakes onto my water color card stock.  Then, I used Distress inks and water with paint brushes to create a color wash all over the paper.  I had to partially dry it with my heat gun several times, and once I was happy with that much, I used a paint brush to flick on drops of the ink for a splatter effect.  I also used some Mister Huey's silver mist to flick on some drops of silver sparkle.


My panel warped quite a bit from all the water, so once it was dry, I pressed it between the pages of a book for a while to flatten it back out as much as possible.  I trimmed it down and mounted it on a velum card base (something I've never done before).  To hide the ugly side of the water colored panel from showing through inside my card, I cut a piece of white card stock just a teeeeeny bit smaller than my panel and adhered it inside the front of the card.  I also used a white panel on the inside back as a place to stamp the inside.

For the front sentiment, I die cut a stitched banner from Lil' Inker Designs and embossed a sentiment from Papertrey Ink with silver embossing powder.  I thought it needed just a little something more, so I used a Papertrey die to cut out the little snowflakes from some silver card stock and glued those down with Ranger Multi Medium Matte.  To adhere my velum sentiment strip to the card front, I used very tiny dots of the same glue on the backs of the larger letters in the sentiment and also behind the die cut stars.


The sentiment on the inside is also from Papertrey and was stamped with PTI's Hawaiian Shores and Memento's London Fog ink.

I enjoyed water coloring on this card, which is something I don't often do because I'm too impatient to wait for things to dry.  But I have to say, the end result is pretty groovy!

TTFN!

11.09.2015

N is for Nuptuals

I'm playing along with the Simon Says Stamp Monday Challenge and the theme this week is words that start with the letter N.  For this project, I'm going with Nuptuals.  ;)


One of my co-workers is getting married and I turned her wedding invitation into an ornament for their Christmas tree.  I sliced it into quarter inch wide strips and then curled them around a pen to create coils.


It looks especially cool because their invitation had a pattern on the back side which shows through inside the coils.  The print from the front of the invitation is on the outside of the coils.


If you turn the ornament to look at it from different angles you can read the names of the bride and groom, the wedding date and location, and any any portions of the text that are visible from that angle.


And a special gift needs a special box.  I picked up this cute gift box from Hallmark and created the tag using stamps and dies from Papertrey Ink.  I adore their Petite Places line of stamps and dies!


These tiny buildings are so fun to create!  And each one also comes with a die that will cut a fold-able, 3D  paper building that can be stamped and then folded into an actual little building!


And last, but not least, is the wedding card.  I used the same little church die and some of the coordinating Scene It background dies.  Those little "doves" are from the PTI In The Meadow die set.  I used patterned paper from PTI and flower sequins from Pretty Pink Posh.


I believe the sentiment is from a PTI set, but I can't remember which one at the moment.  And it is stamped onto a banner which is also a PTI die cut.  

I had so much fun playing with these tiny churches and backgrounds!  Someone else needs to get married so I can pull them out again!  :)  TTFN!